
A Quick Refresher on DNS
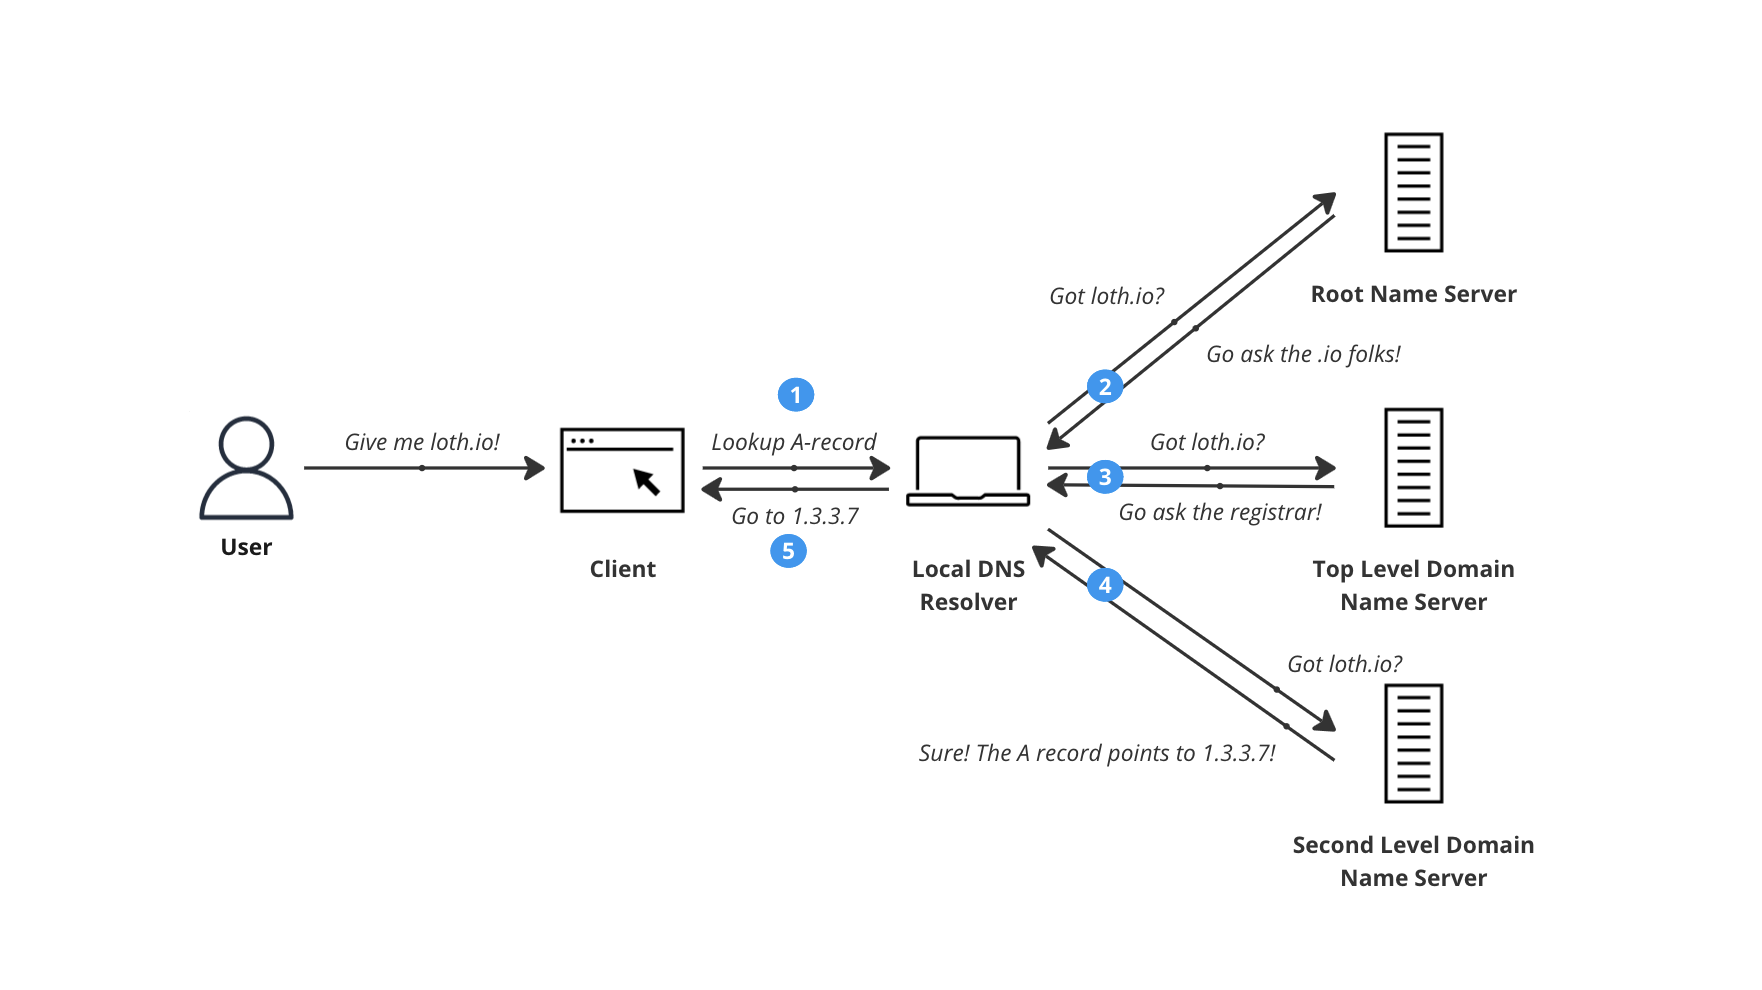
Domain Name System (DNS) is a system that translates domain names to IP addresses. It’s a bit like a phone book for the internet. When you type in a domain name in your browser, your computer looks up the IP address of the domain name in the DNS server. An intricate dance of requests and responses is made to get the IP address of the domain name you’re looking for, passing through Root Name Servers (which are globally operated and overseen by ICANN), the Top Level Domain (TLD) Name Server (TLD’s run .com, .io and more), and the Second Level Domain (SLD) Name Server which might be your domain registrar.
Luckily, this is all extremely fast and a lot of the time, your computer will have the IP address cached already, so it doesn’t have to go through this whole process every time you visit a website. This is why after changing a record you might have to flush your local DNS cache if you want to see the changes immediately. This cache is operated based on the Time-To-Live (TTL) value of the record, which you can set anywhere between minutes to days based on how often you expect the record to change.
If you’ve bought a domain to host your own website or hobby project before, you’ve likely had access to a portal provided by your domain name registrar where you can manage your DNS records for the domain. This is where you can set up A records, CNAME records, MX records and more. But what do these records all mean?
| Record Type | Description | Example Value |
|---|---|---|
| A | Address record, which maps a domain name to an IP address. | 192.0.2.1 |
| AAAA | IPv6 Address record, which maps a domain name to an IPv6 address. | 2001:0db8:85a3:0000:0000:8a2e:0370:7334 |
| CNAME | Canonical Name record, which maps a domain name to another domain name. | www.example.com |
| MX | Mail Exchange record, which maps a domain name to a list of mail exchange servers for that domain. | mail.example.com |
| TXT | Text record, which can contain arbitrary text and is used for various purposes such as verifying domain ownership, setting up email security, and more. | “v=spf1 -all” |
These are just examples for some basic records, but there’s many more types of records you can set up. For example, SRV records for service discovery, or NS records to delegate a subdomain to another DNS server.
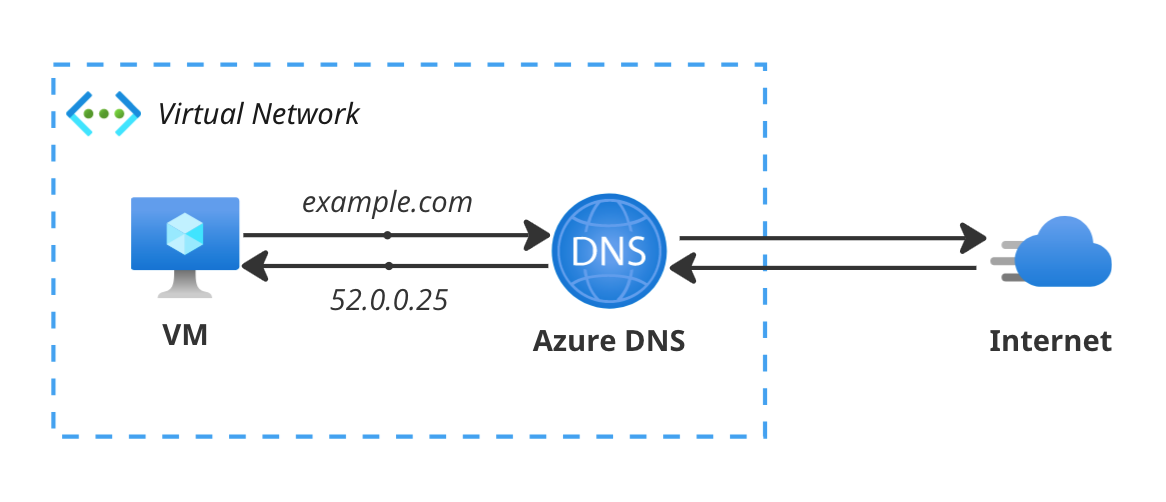
When resolving DNS queries from within Azure, the flow looks a bit like the (simplified) diagram shown below. The local DNS resolver is replaced by Azure DNS, the default DNS resolver provided by Azure. You don’t need to configure or deploy anything to use it, it’s just there when you need to resolve anything. While there’s a VNet in the diagram around the Virtual Machine, it’s not limited to just compute resources using private networking. By default, public resources also use the Azure DNS resolver. In the next few chapters I’ll show you how you can extend this to manage your own public and private DNS records in Azure.
Now that we’ve got the basics down, let’s talk about why and how you can manage your DNS records in Azure.
Why manage DNS in Azure?
Managing DNS records through your domain registrar is a perfectly fine way to manage your DNS records. It’s a system that’s been around for a long time and is very reliable. However, if you’re already using Azure for your infrastructure, it’s really nice to have everything in one place. This way, you can manage your DNS records in the same place as your compute resources, and you can use the same identity and access management (IAM) system to manage access to your DNS records as you do for your other resources.
Key Features of Azure DNS include:
- Global Anycast network: Azure DNS is hosted on Microsoft’s global network of DNS servers, which means your DNS queries will be answered by the closest server to you.
- Security: using role-based access control (RBAC) you can use Azure’s IAM system to manage access to your DNS zones and records. Using locks, you can prevent accidental deletion of records or zones.
- Integration with other existing Azure services: using Alias records you can link records to Azure resources. This means that records are automatically updated when the IP address of the linked resource changes, or deleted when the resource is deleted.
- Built on Azure Resource Manager: This means you can manage your DNS zones and records using the same tools and APIs you use for your other Azure resources, like Azure CLI, Azure PowerShell, and Infra-as-Code tools like Bicep, ARM and Terraform.
- Ease of use: Azure DNS is a fully managed service, which means you don’t have to worry about patching, scaling, or maintaining the service. The Azure Portal provides a nice interface to manage your DNS zones and records, similar to what you might be used to from your domain registrar’s portal.
Public DNS Zones
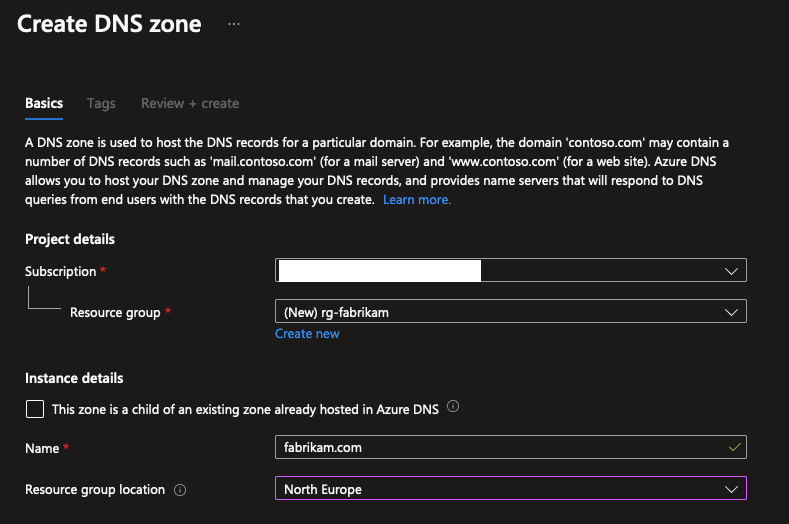
Let’s get started with creating our first DNS Zone in Azure. Create a new resource, and search for “DNS Zone” to find the two flavors that Azure offers.

Select the regular DNS Zone, and fill in the details. You’ll need to fill in the name of the zone, and the resource group you want to create it in. The name of the zone equals the domain name you want to manage. For example, if you want to manage the domain example.com, you would fill in example.com as the name of the zone. In this case, we’re going with fabrikam.com, a fictional company that’s been used in Microsoft documentation for years.
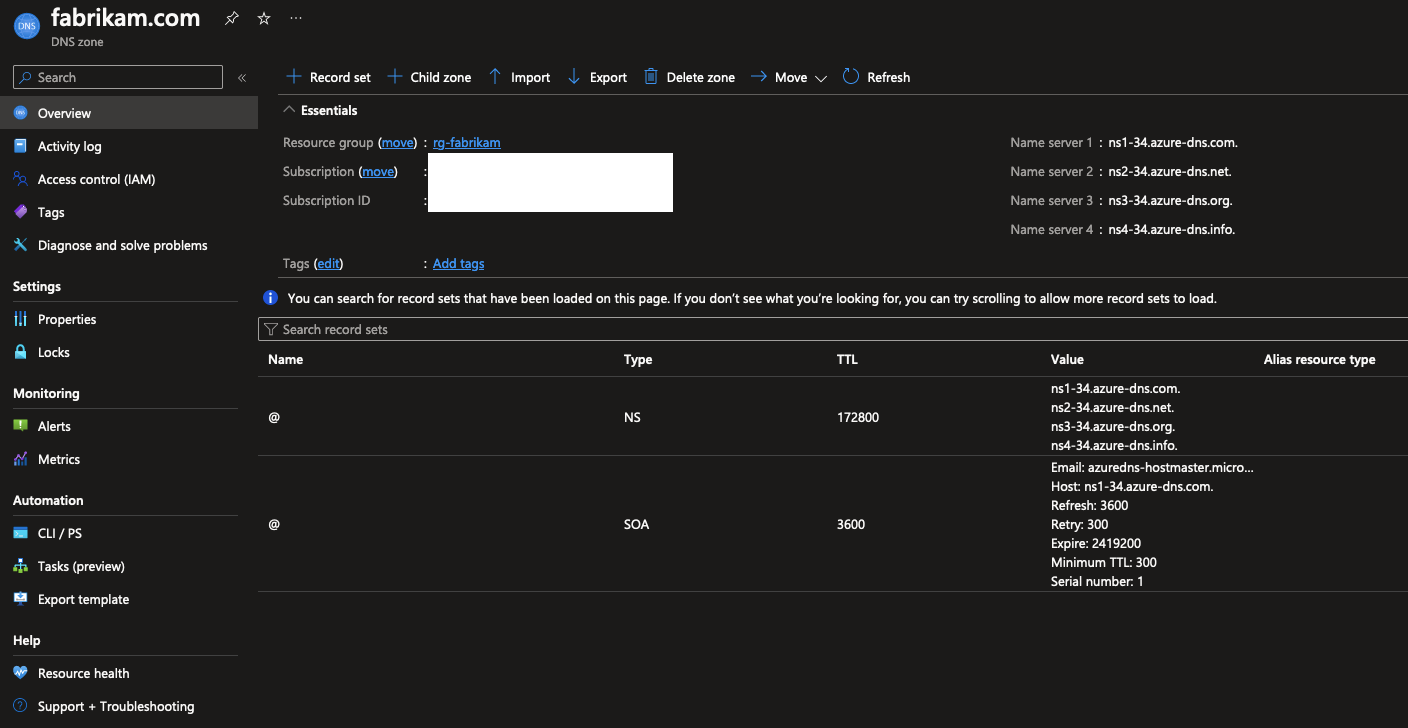
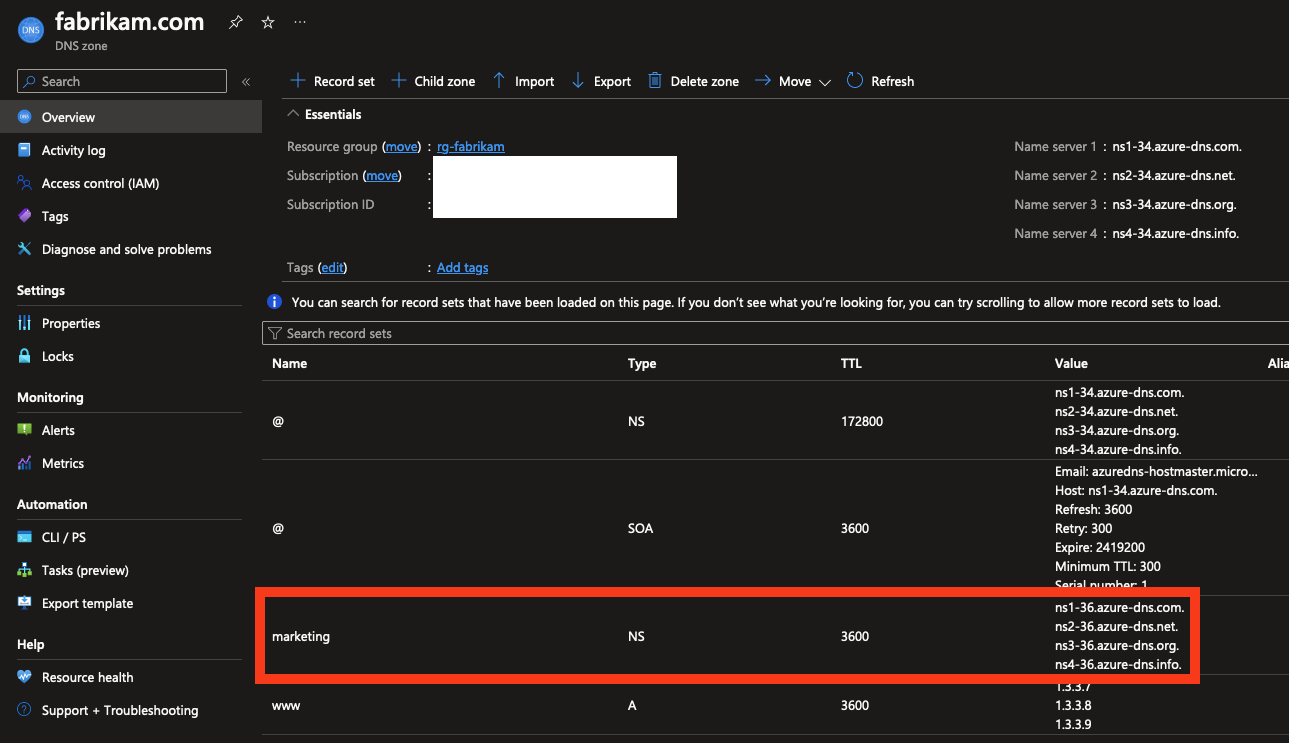
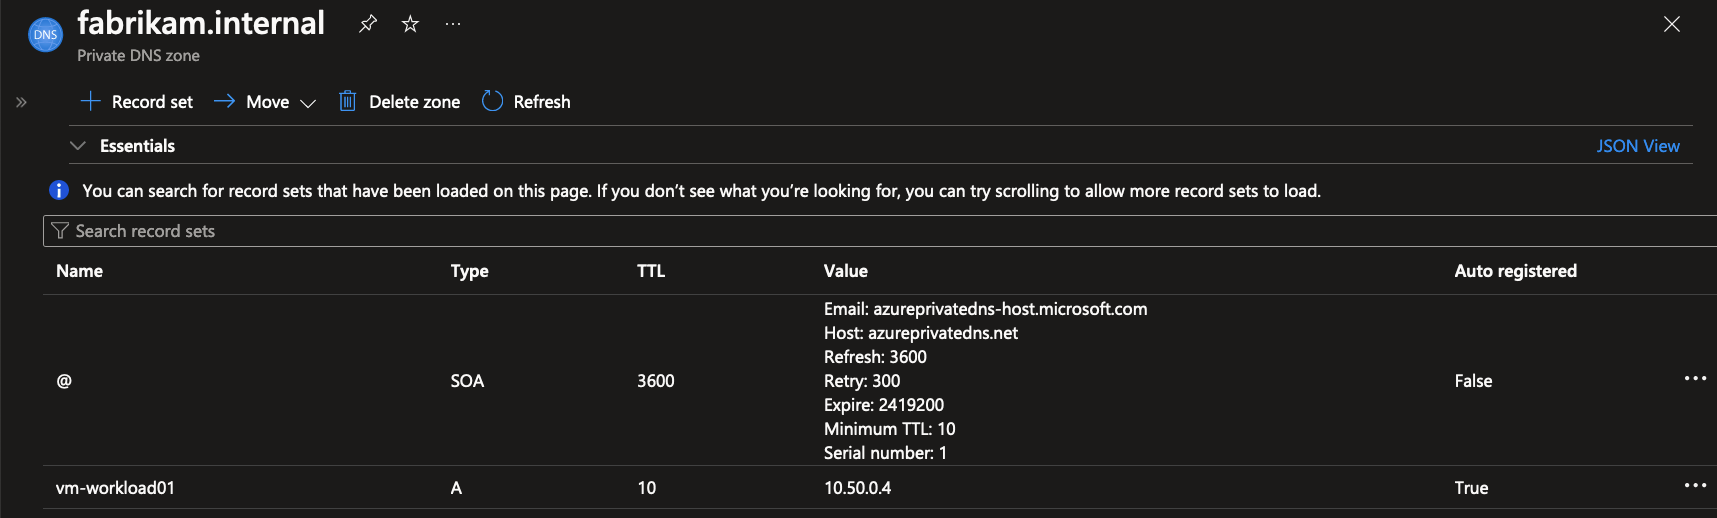
After filling in the details, create the resource and wait for it to be deployed. Afterwards, you can view the newly created DNS Zone in the Azure Portal. There’s a few things already defined in the zone, like the SOA record and the NS records. The SOA record is the Start of Authority record, which contains administrative information about the zone, like the primary name server for the zone. The NS records are the Name Server records, which define the authoritative name servers for the zone.
The next step is to delegate the domain to Azure. This means that you need to tell the domain registrar that Azure is now the authoritative name server for the domain. This is done by setting the NS records of the domain to the NS records of the DNS Zone in Azure. This is done in the domain registrar’s portal, and the exact steps depend on the registrar you’re using. There’s an excellent tutorial on the MS Learn documentation that covers the steps you should take to fully set it up and verify it works correctly. For the purposes of this demo, I’m going to skip this step as the domain fabrikam.com is fictional and not actually mine.
Now that the DNS Zone is set up and delegated, you can start adding records to the zone. You can add records by clicking the “Add record set” button in the Azure Portal. You can add A records, AAAA records, CNAME records, MX records, and more. You can also add records in bulk by importing a zone file, which is a text file that contains all the records for the zone. This is useful if you’re migrating from another DNS provider and want to import all your records at once.
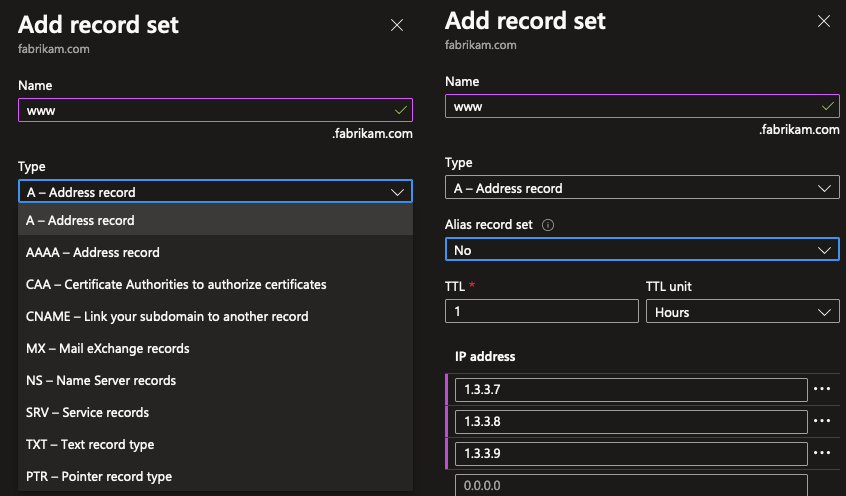
The example shown above might raise some questions: an A-record containing multiple values? This is called a “round-robin” setup, where the DNS server will return the IP addresses in a round-robin fashion. This is a primitive way to load balance traffic, but it’s not a very sophisticated way of doing it as it doesn’t account for server downtime. For more advanced load balancing, you might want to look into Azure Traffic Manager, Front Door, Application Gateway or just a public Load Balancer.
From here on, it’s just a matter of adding the records you need for your domain. If you’re hosting a website, you’ll need an A record that points to the IP address of your web server. If you’re hosting email, you’ll need MX records that point to your mail servers. If you’re using a content delivery network (CDN) like Azure Front Door or Cloudflare, you might need CNAME records that point to the CDN’s domain name. It’s all up to you to define the records you need.
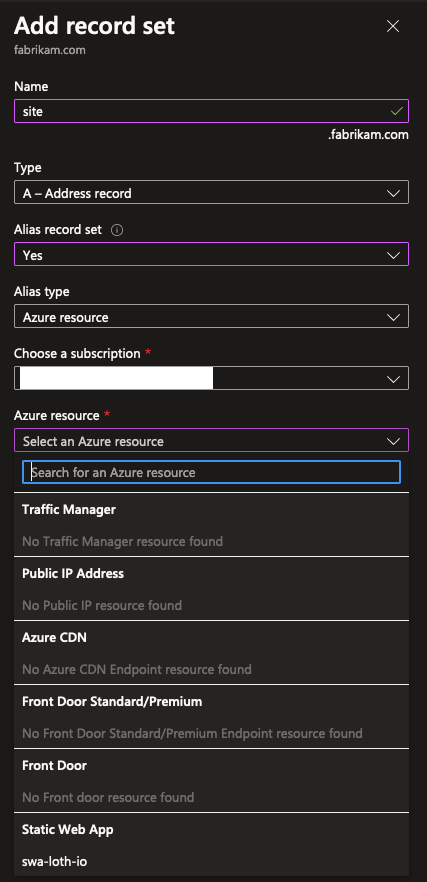
There’s an interesting Azure-specific feature you can use here as well: the Alias record set. This is a special type of record that you can use to link a record to an Azure resource. For example, you can link an A record to a public IP address, and the record will automatically be updated when the IP address of the resource changes. This is useful if you’re hosting a website on a VM which has a dynamic IP address, and you want to make sure the website is always reachable even if the VM gets regularly deallocated. The Alias record set will make sure the record is always up to date, without you having to manually update it. You can read more about the Alias record set in the official documentation.
It’s also possible to delegate a subdomain in your DNS Zone. This is useful if you want to delegate a subdomain to another DNS server. For example, if you want to delegate subdomain.fabrikam.com to another DNS server outside of Azure, create a “NS” record set in the DNS Zone that points to the name servers of the other DNS server. This is useful if you’re using a third-party service like Cloudflare for your CDN, and you want to delegate the subdomain to Cloudflare’s name servers.
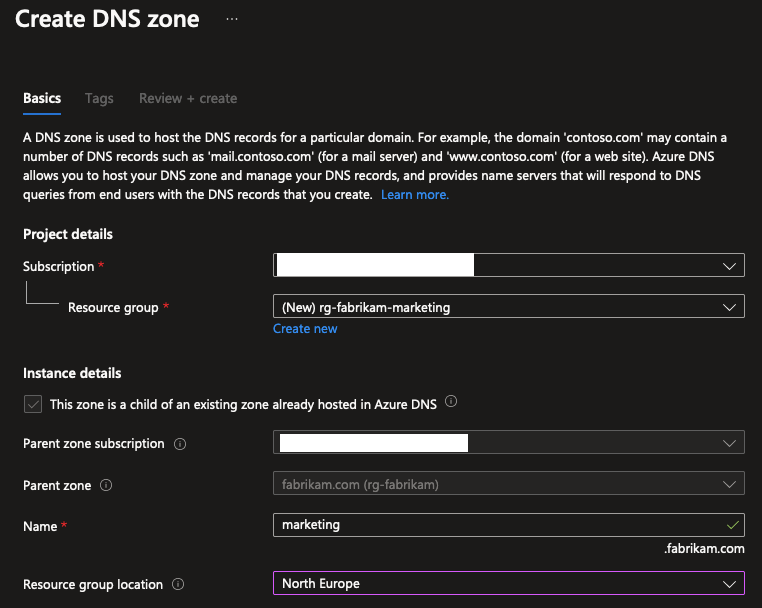
If you want to keep things within Azure but manage subdomains separately, like delegating the management of the marketing.fabrikam.com subdomain to the marketing team, you can create a Child DNS Zone in the Azure Portal. This is a separate DNS Zone that’s managed separately from the parent zone, but it’s still linked to the parent zone. This means that the parent zone is still the authoritative name server for the subdomain, but the subdomain can be managed separately and be placed in a separate resource group, or even a separate subscription.
To do this, use the “Add Child zone” button in the portal and create a new DNS Zone specifically for a subdomain. You can place it in another resource group or subscription if you want to.
The result is another plain DNS Zone with some default configuration. You can add records to this zone just like you would with the parent zone, and the records will be authoritative for the subdomain.
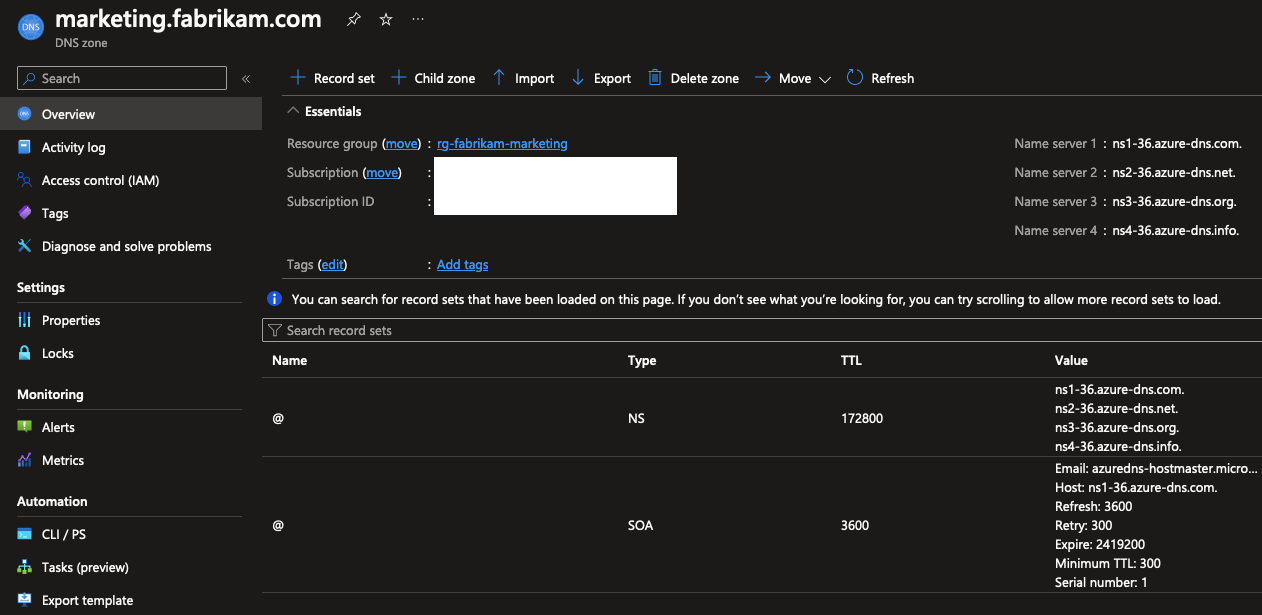
In the parent DNS Zone, you can see that a NS record has been added for the subdomain, which points to the name servers of the child zone. The setup is basically the same as when you delegate a subdomain to another DNS server outside of Azure, but in this case, the subdomain is still managed within Azure.
The only downside to this is that the parent-child link is implicit: you cannot click through to the child zone from the parent zone, and you cannot see the parent zone from the child zone. The only hint that the zones are linked is the NS record in the parent zone that points to the Azure DNS name servers. This might not mean a big deal to you if you’re managing the zones yourself, but it’s something to keep in mind if you’re managing tens to hundreds of zones spread across a big enterprise using this delegation approach.
Managing access to the DNS Zone is done through the RBAC IAM system. You can use built-in roles like DNS Zone Contributor to give someone access to manage the records in the zone. It’s good to note that these roles are scoped to the DNS Zone: you give access to all or none of the records in the zone. If you want more fine-grained control, you can delegate subdomains to other DNS Zones and manage access to those zones separately.
The last thing left to cover is the cost of using Azure DNS. There is a tiny monthly fee per DNS zone that you create, and next to that there’s dynamic pricing based on the number of DNS queries that are made to the DNS Zone. The pricing is very reasonable, and for many cases, you won’t have to pay more than a couple of dollars per month. You can read more about the pricing on the official pricing page.
TL;DR: Public DNS Zones
- It’s just DNS as you know it, but managed in Azure.
- You can use RBAC to manage access to your DNS records as you do for any other Azure resources.
- You can use Alias records to automatically update records when the linked resource changes.
- Using Child DNS Zones, you can delegate subdomains to other DNS Zones and manage them separately.
Private DNS Zones
Now that I’ve shown you the basics on Public DNS Zones, it’s time to talk about Private DNS Zones, because this is where Azure DNS gets interesting! Private DNS Zones are used to resolve names in a private network without the need for a custom DNS solution. This is useful if you’re using Azure Virtual Networks (VNets) and you want to resolve the names of the resources in the VNet using a custom domain name. For example, if you have a VNet with a bunch of VMs and you want to resolve the names of the VMs using the domain name fabrikam.internal, you can use a Private DNS Zone to do this.
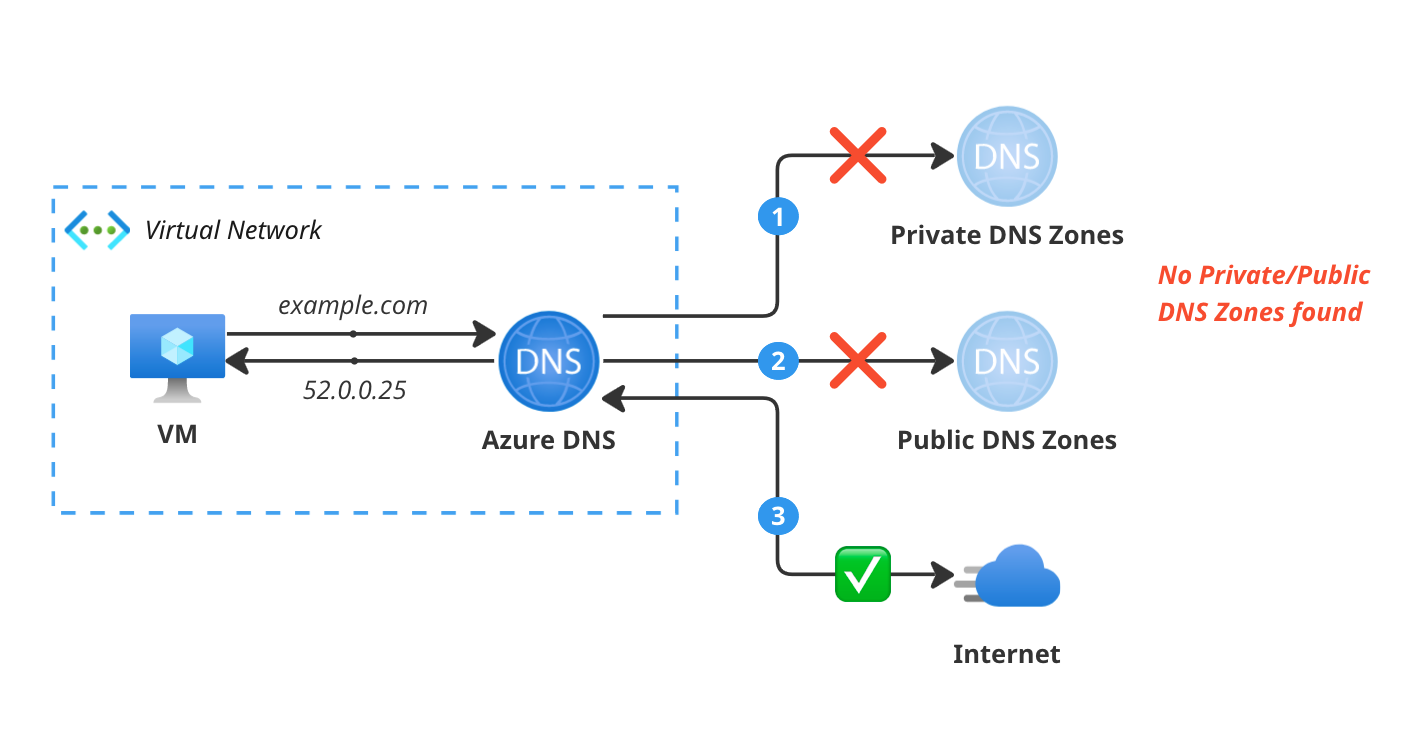
The difference is best explained with these three diagrams, starting with just regular DNS resolution in Azure. In this case, a VM in a VNet is trying to resolve the name example.com. The request is made to the Azure DNS resolver, which checks if there’s any Private DNS Zones linked to the VNet for example.com. If there’s no Private DNS Zones found, it checks if there’s any Public DNS Zones for example.com. If there’s no Public DNS Zones found, it tries to resolve the name over the internet.
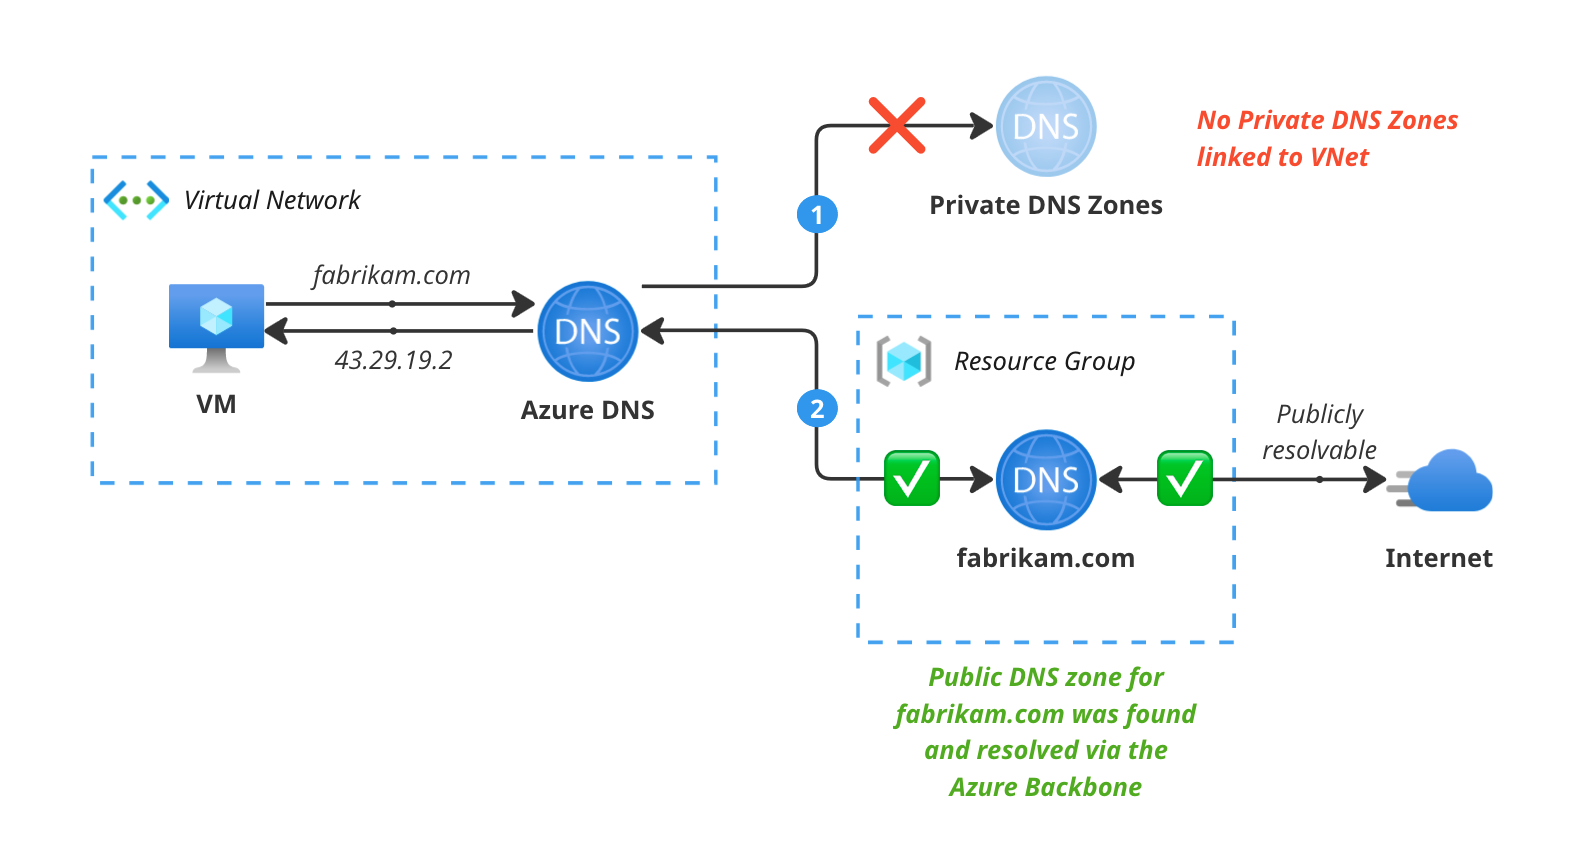
So what happens if you do use Public DNS Zones in Azure? In this case, the Azure DNS resolver again checks if there’s any Private DNS Zones linked to the VNet for fabrikam.com. If there’s no Private DNS Zones found, it checks if there’s any Public DNS Zones for fabrikam.com. If there’s a Public DNS Zone found, it resolves the name using the records in the Public DNS Zone over the Azure backbone network.
Note here that because it’s a Public DNS Zone, the records are also accessible over the internet, which is fine if you’re hosting a website or a public API. But if you’re hosting a private API or a database, you might not want the records to be accessible over the internet.
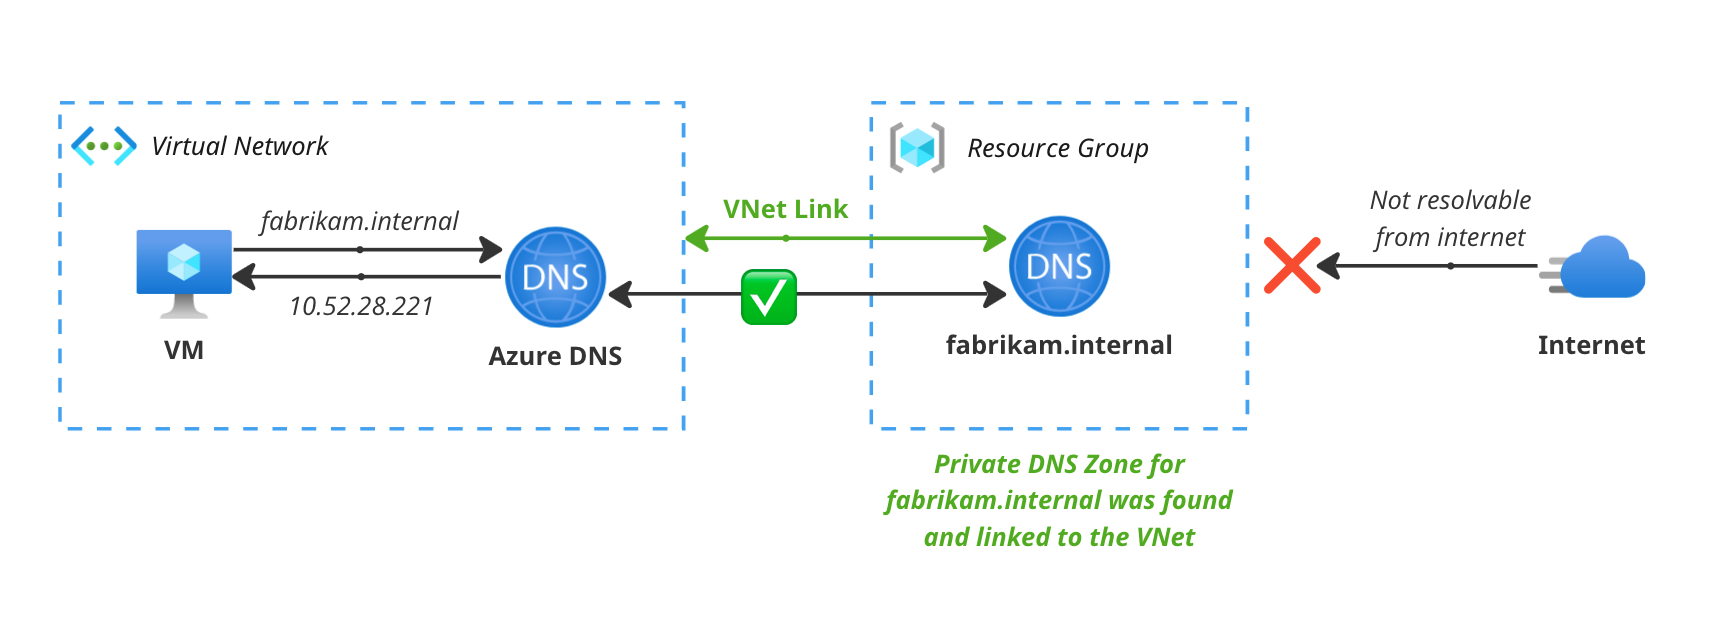
Private DNS Zones are, as you guessed it, Private. They are only resolvable from within a VNet and not from the outside. This is great for resolving internal services that you don’t want to be accessible from the internet, like your testing and staging environments, or your internal databases and APIs that are only meant to be accessed from within your network.
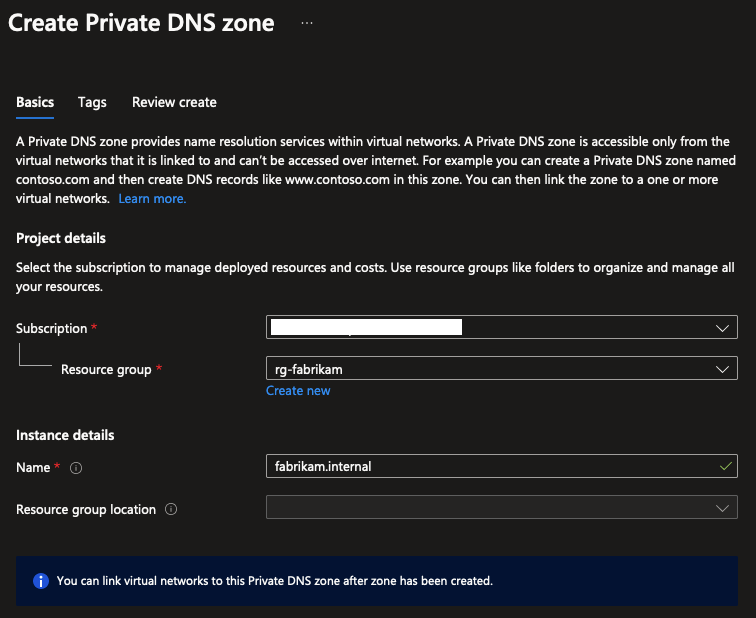
Creating a Private DNS Zone is very similar to creating a Public DNS Zone. Create a new resource, and search for “Private DNS Zone” to get started. Here, you can fill in your custom domain name, and the resource group you want to create it in. In this case, I’m going with fabrikam.internal as the name of the zone to clearly separate it’s purpose from fabrikam.com.
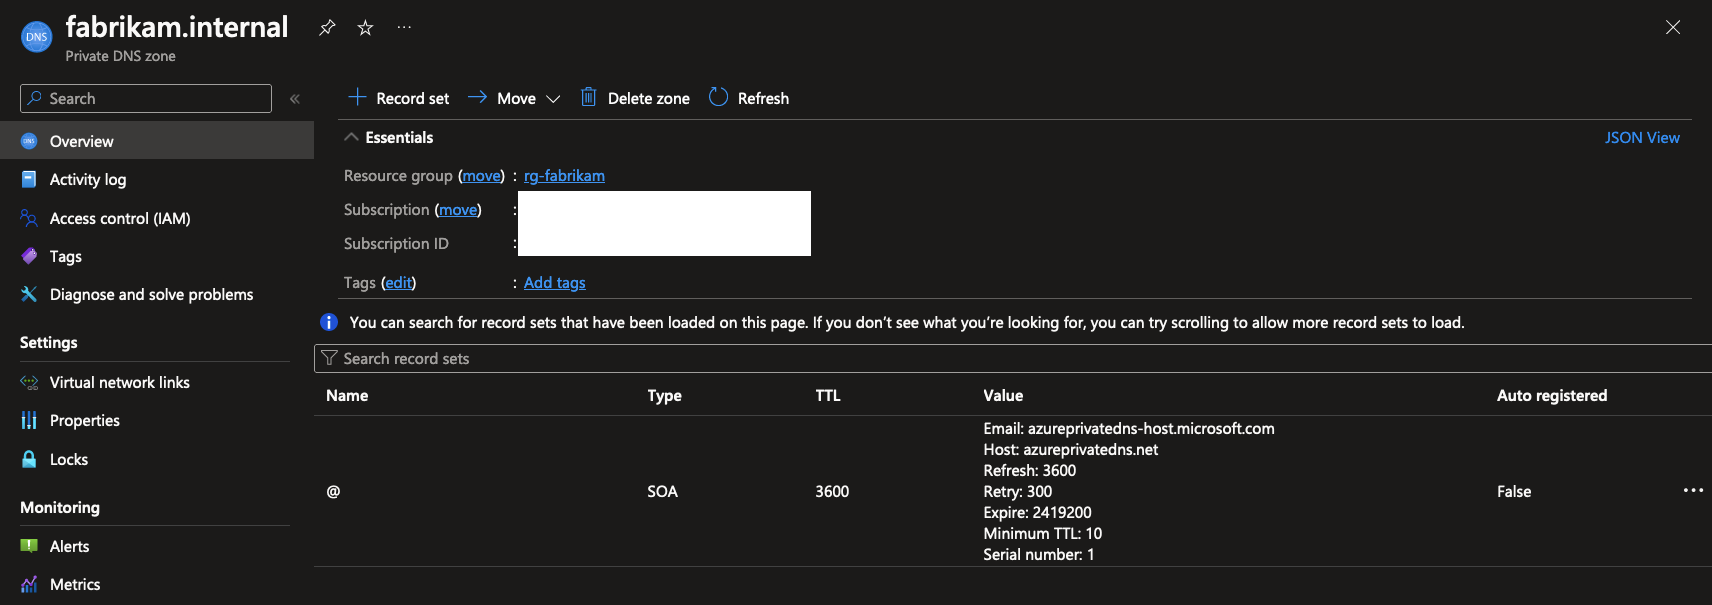
The result is similar to a newly created Public DNS Zone with one minor difference: there’s no NS records to define the name server of Azure DNS.
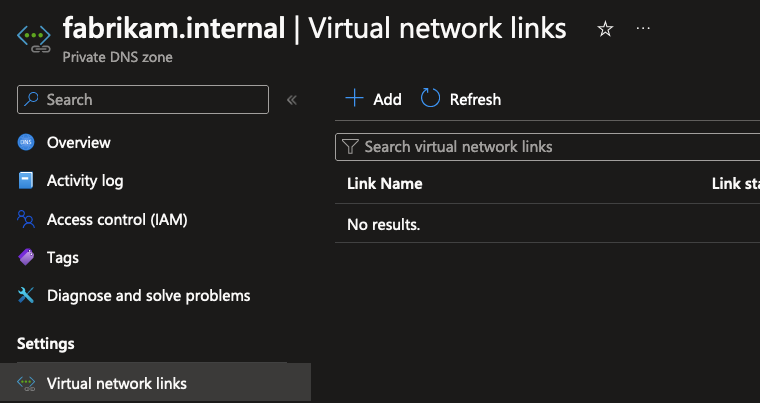
This is because Private DNS Zones have to be linked to a VNet to resolve anything. You can link a Private DNS Zone to a VNet by creating a “Virtual network link” in the Private DNS Zone. You can link the zone to one or more VNets, regardless of the region your VNet is deployed to. Using linking, you can resolve the names of resources across any VNet in any region using the same single Private DNS Zone!
Because Private DNS Zones have to be linked to a VNet explicitly, it also means you can selectively enable certain VNets to resolve names using the zone. This is useful if you have a VNet that’s used for development and testing, and you don’t want the resources in that VNet to resolve the names in the Private DNS Zone meant for the staging environment. You can simply not link the staging zone to that VNet to prevent this.
To add a VNet link, use the “Virtual network links” menu to add a new link.
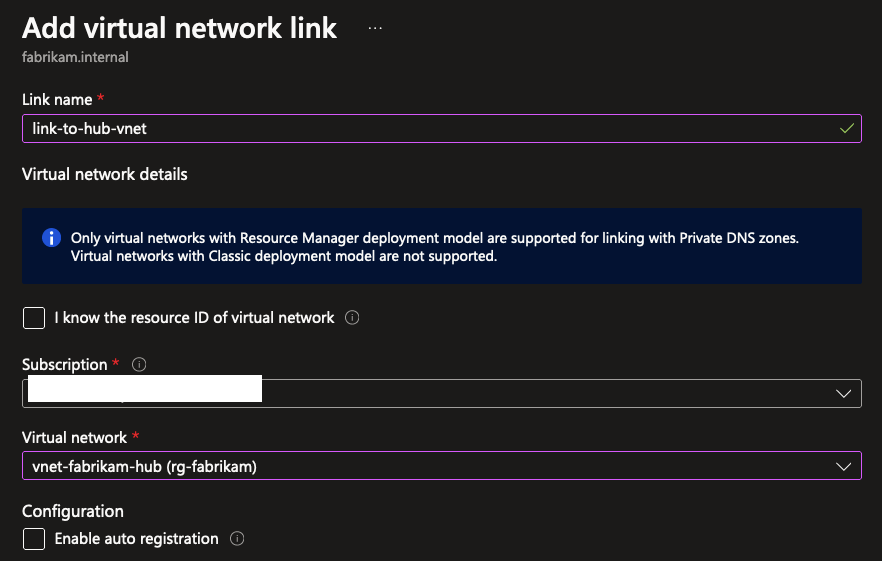
During creation of the link, you have to pick the VNet to link the Private DNS Zone to. All resources in that VNet will be able to resolve the names in the Private DNS Zone. You can create as many links as you want to link the zone to multiple VNets.
Practical Example of using Private DNS Zones
For this practical example, I’ve prepared a hub VNet with one spoke VNet peered together. The spoke contains a virtual machine for running workloads, and the hub also contains one virtual machine acting as a jumpbox machine which can be used to access spoke resources. The fabrikam.internal Private DNS Zone has been linked to both VNets so they can use the zone to resolve names, but the spoke VNet has an additional feature enabled: Enable auto registration.
Note: In a real production scenario, please look into using Azure Bastion instead of a jumpbox VM with a public IP address!

When Enable auto registration is enabled, the DNS server in the VNet will automatically register the names of virtual machines in the VNet in the Private DNS Zone. This means that you don’t have to manually add records to the zone for every virtual machine in the VNet, the records are automatically added and removed when new VM’s are created and deleted.
Enabling auto registration for Private DNS Zone links not only adds and removes records for new/deleted VM’s, but also updates records when VM’s are stopped and deallocated. This means DNS records will also be removed when workloads are not running!
After deploying a new virtual machine called vm-workload01 to the spoke network, you can see it was automatically added to the Private DNS Zone with it’s private IP address. The jumpbox machine can then resolve the name vm-workload01.fabrikam.internal to the private IP address of the virtual machine to connect to it.
Let’s try out if everything works!
First of all, I opened a new RDP session to my jumpbox machine. From there on, I can resolve the name of the virtual machine in the spoke network using the nslookup command. The result shows that the name resolves to the private IP address of the virtual machine, which means the Private DNS Zone is working correctly.
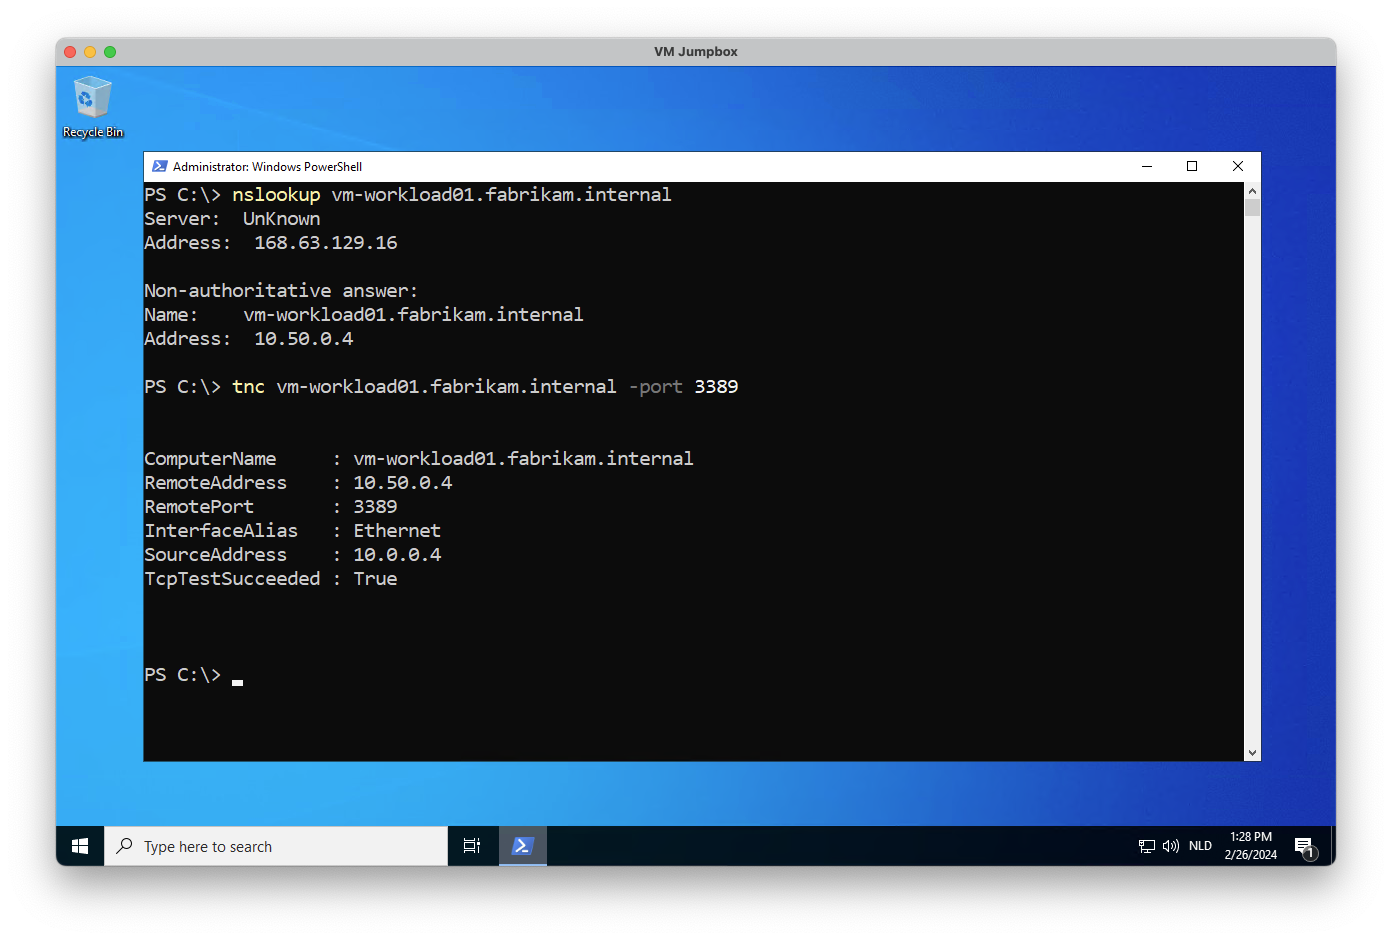
Next, I used the tnc (Test-NetConnection) command to test if I can reach the virtual machine over the network. The result shows that the virtual machine is reachable, which means the Private DNS Zone is working correctly and the virtual machine is running and accepting network traffic.
As you can see from the result of the
nslookupcommand, the DNS server returning the private IP address ofvm-workload01has the IP address168.63.129.16. This is a static IP address owned by the Azure platform used for DNS resolution and more. Read more about it over here.
This sums up how you can use Private DNS Zones to resolve names in your private network! I personally like it a lot because it’s a very hands-off approach to managing DNS records in a VNet, and it’s very easy to set up and use. You can link as many VNets as you want (well, no more than 1000) to the same Private DNS Zone, and you can use the same zone to resolve names in multiple VNets across multiple regions.
TL;DR: Private DNS Zones
- Private DNS Zones enable you to resolve names for resources in a private network.
- Records are only resolvable from within a linked VNet and not from the outside.
- Private DNS Zones work across regions and can be linked to multiple VNets at the same time.
- You can register the names of virtual machines in a Private DNS Zone automatically using the auto registration feature.
- There are some minor limitations to keep in mind, like not being able to delegate subdomains to other Private DNS Zones, or certain zone names being restricted.
- Private DNS Zones are resilient to regional outages because records are replicated across regions.
- Pricing is identical to Public DNS Zones: a small monthly fee per zone and dynamic pricing based on the number of DNS queries that are made to the zone.
Advanced Private DNS Capabilities
While Public DNS Zones are relatively straight-forward, there’s a lot more you can do with Private DNS Zones to leverage their power. There’s multiple concepts I’ll briefly show you here on what else you can do with them.
Private Link
Using Private Link is arguably the most well known scenario for using Private DNS Zones. They enable you to access Azure PaaS services from your VNets without having to expose them to the internet. This is useful if you’re using services like Azure SQL Database, Azure Storage, or Azure Key Vault and you want to keep all traffic within your network.
You do this by deploying a Private Endpoint: a network interface that connects you privately to the resource. Private endpoints have to be linked to the PaaS service, and once that’s complete the resource is accessible from your VNet using the private IP address of the private endpoint. This way, all traffic stays within your network and doesn’t go over the internet. No firewall rules and minimal NSG configuration required!
The role of Azure Private DNS is to resolve the names of the private endpoints to the private IP addresses of the services. This is done by creating a Private DNS Zone for the service, and linking the Private DNS Zone to the VNet. The Private DNS Zone contains the records for the private endpoints, and the VNet uses the Private DNS Zone to resolve the names of the private endpoints.
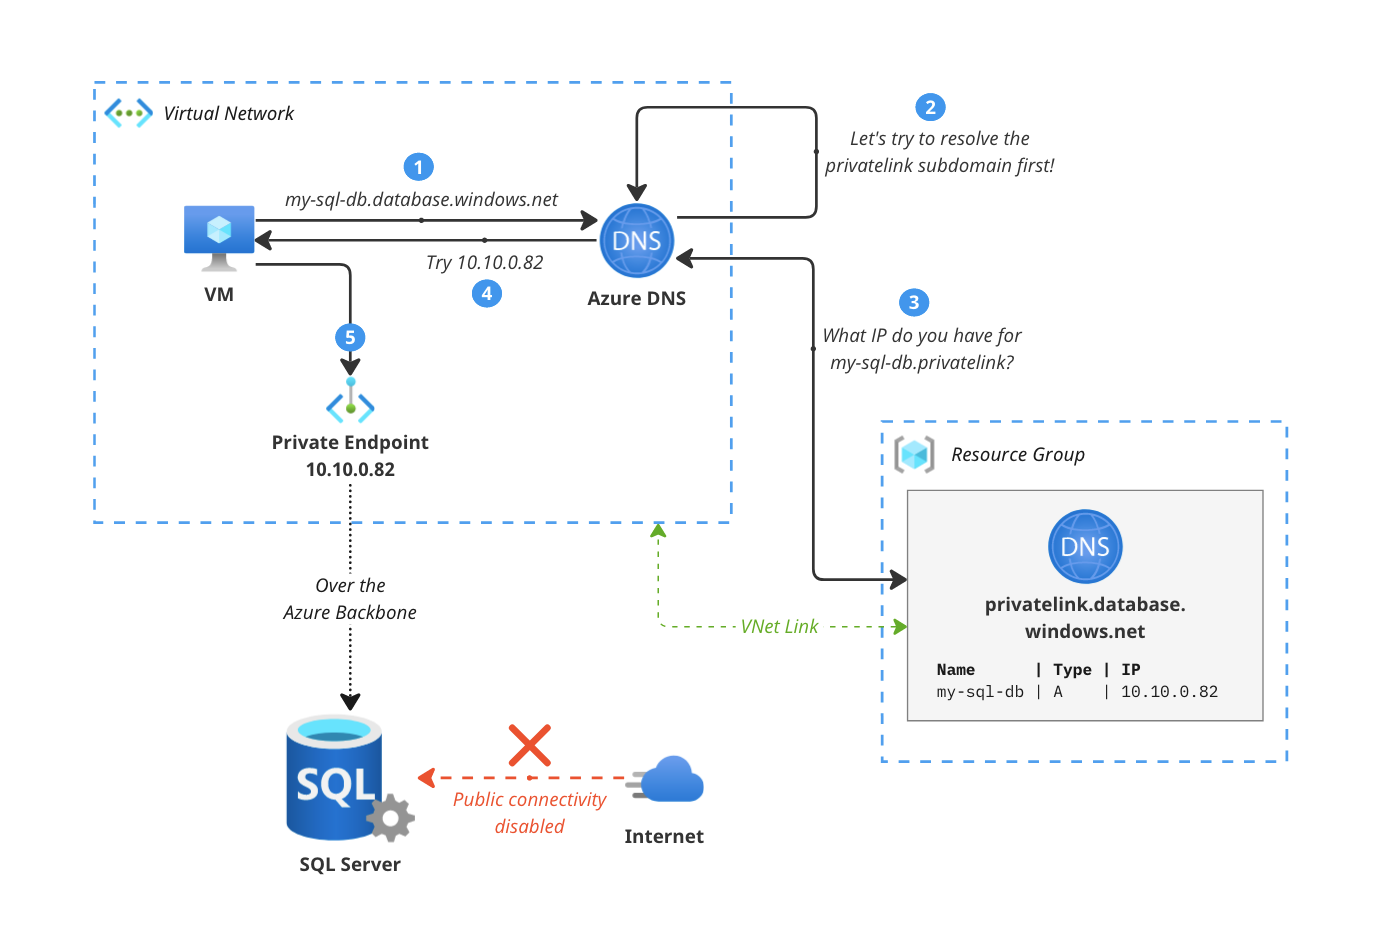
There’s a specific DNS resolution flow that’s used when using private link, which is to query the normal domain first (so you can keep using any existing connection strings you already have), after which Azure DNS itself tries to resolve the Private DNS zone first before defaulting to the normal public DNS resolution flow. Matt Felton wrote a great blog post about how this works in detail if you want to know more.
Note: Using Private Endpoints can get pretty expensive if you use them extensively for lots of different services. Each endpoint costs a couple of dollars per month, and there is also a per-GB charge for all data processed. Be sure to check out the Azure pricing calculator to see what the impact would be for you.
You can read more about Private Link over here. You can even use Private Link to expose your own private services to other (customer) private networks over the Azure backbone network using Private Link Service. There’s also a great write-up about using private link at scale over here, including best practices for setting them up in a Hub-Spoke network.
Split-Horizon DNS
Imagine you have a very big network with dozens of workloads running at all times. Some might be private, some might be public like API’s for your website or mobile app. In some cases, you’ll want to resolve the names of these public resources from your private workloads. Generally, this means you’ll set up a Public DNS Zone for your public API and create, for example, an A record pointing to a public load balancer.
However, for your private workloads, you might want to keep all traffic within your network and not have it go over the internet. Additionally, in some cases you might want to host a private instance of the same API specifically for your private workloads to interact with. This is where Split-Horizon DNS comes in.
The concept is simple: you create a Private DNS Zone with the same name as the Public DNS Zone to “override” it, and you create the same records in the Private DNS Zone as you have in the Public DNS Zone. When a DNS query is made from within the VNet, the Azure DNS resolver will first check the newly created Private DNS Zone for the name. You can then set up the records in the Private DNS Zone to point to the private IP addresses of the resources in your VNet, or to a private load balancer that’s only accessible from within your network. This way, all traffic stays within your network and doesn’t go over the internet.
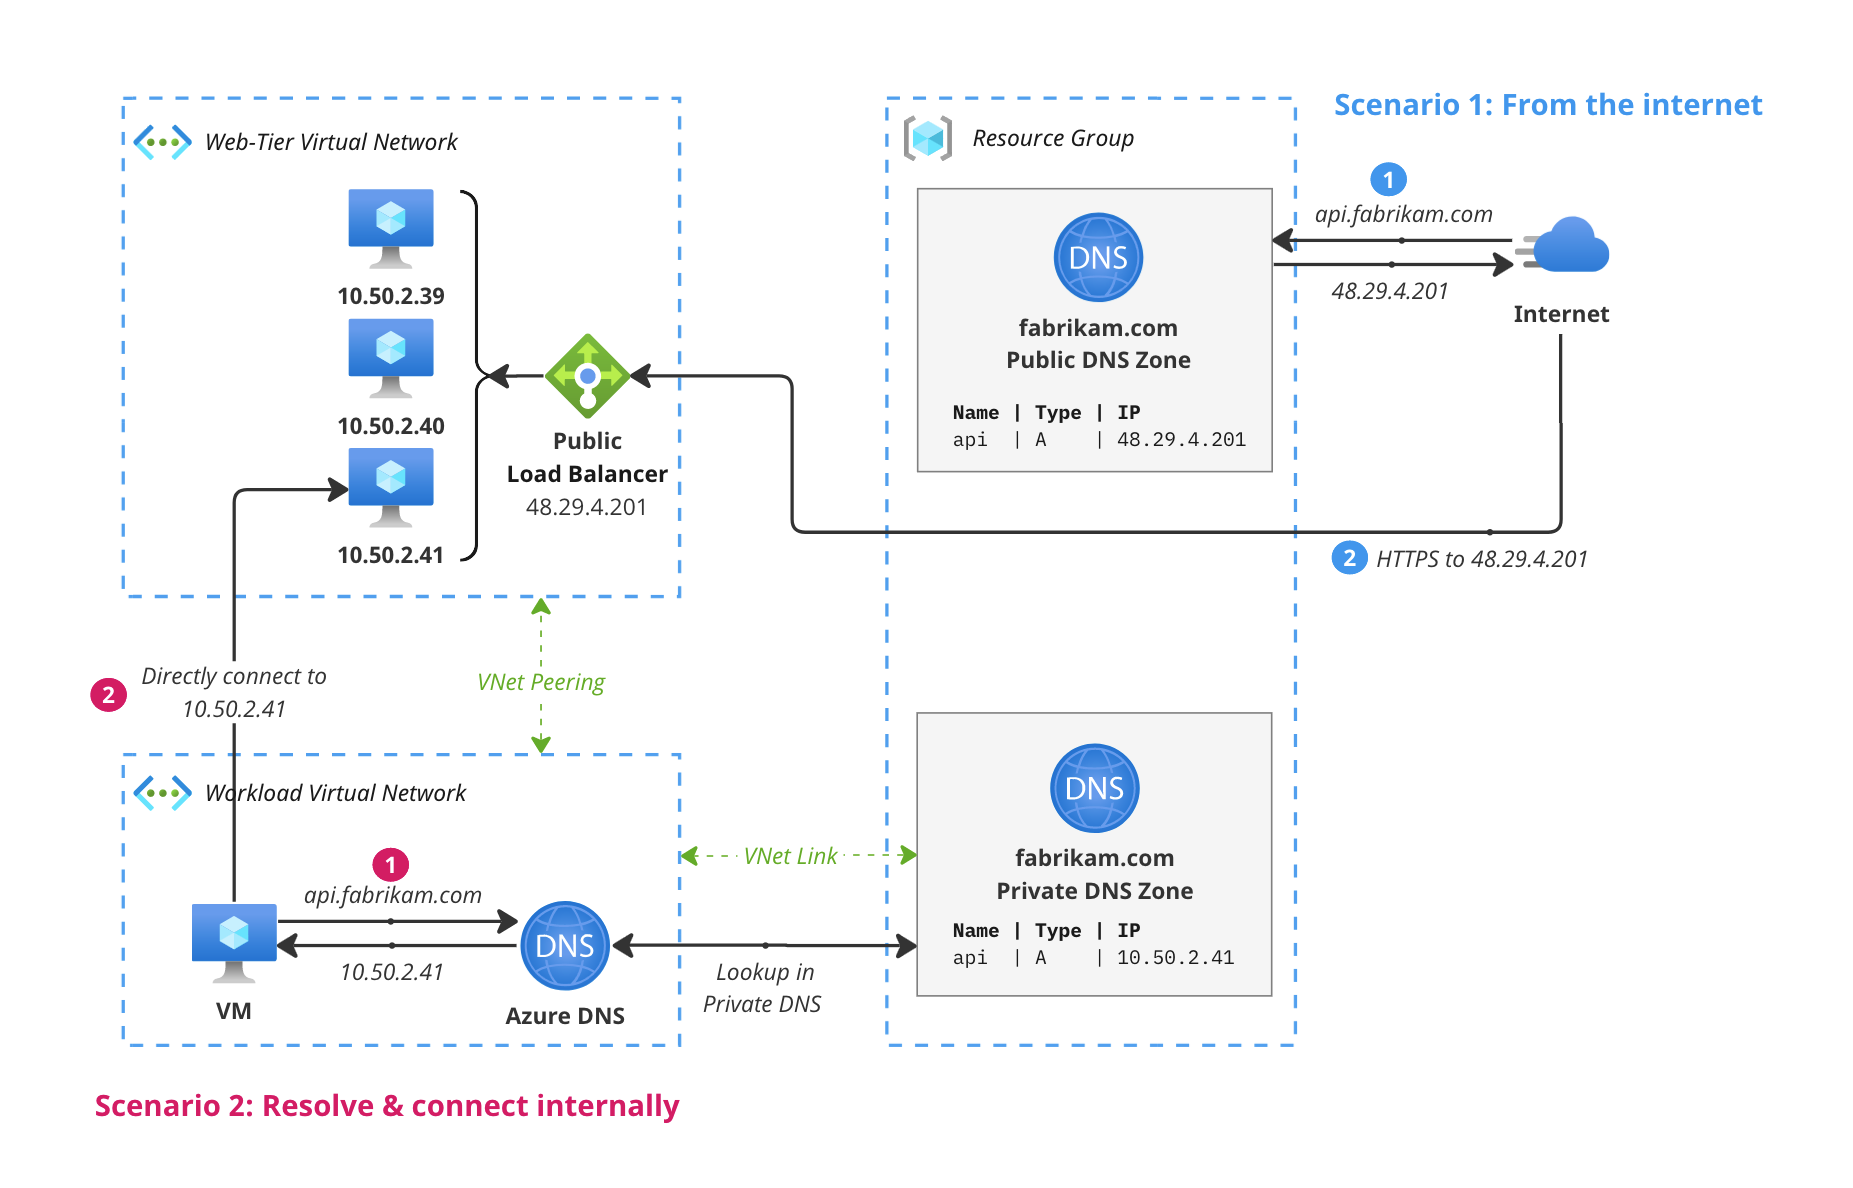
You can use this set-up to optimize your network flows and keep things private as much as possible. The diagram above is a bit simplified of course, you could use a private load balancer to load balance traffic between multiple private API instances or use an entirely different solution for internal use.
Note: Be aware that creating a Private DNS Zone with the same name as a Public DNS Zone completely overrides all records created in the public zone. Azure does not try to resolve things using your Public DNS Zone if the Private DNS Zone doesn’t contain the requested record. You’ll have to keep the records in the Private DNS Zone up to date with the records in the Public DNS Zone if you want to keep things consistent, or you might unintentionally break your network setup.
Technically, you can abuse this feature to create a Private DNS Zone for any domain name, even if you don’t own the domain name. There might be some use cases for it, but it’s generally not a good idea to do this. It’s best to use Split-Horizon DNS only for domain names that you own and control, and only if you have a good reason to do so.
Private Resolvers
Azure DNS Private Resolvers are a way to utilize Azure DNS from an on-premises network which might have it’s own (Windows) DNS Server. Using a Private Resolver, you can forward DNS queries from your on-premises network to Azure DNS, and resolve the names of resources in your Azure VNets using the Private DNS Zones.
You can also configure a Private Resolver to forward DNS queries from Azure to an on-premises DNS server. This is great if you need to resolve the names of resources in your on-premises network using a custom domain name, and you want to use the same DNS server to resolve the names of resources in your Azure VNets.
The low-tech solution to this is to simply duplicate all records in both your on-premises DNS server and Azure DNS, but this is not very scalable and it’s prone to errors. Using a Private Resolver, you can keep using your existing on-premises DNS server while also being able to migrate over to Azure Private DNS Zones at your own pace.
You can read more about Private Resolvers over here.
Infra-as-Code
Of course, one of the things we really love about using Azure to manage our infrastructure is the ability to define everything in code. Azure DNS is no exception to this, and you can use Bicep, ARM, Terraform, or any other Infra-as-Code tool to define your DNS Zones and records.
Creating a Public DNS Zone using Bicep is really easy:
resource zone 'Microsoft.Network/dnsZones@2018-05-01' = {
  name: 'fabrikam.com'
  location: 'global'
}

resource record 'Microsoft.Network/dnsZones/A@2018-05-01' = {
  parent: zone
  name: 'api' // Subdomain
  properties: {
    ttl: 3600
    aRecords: [
      {
        ipv4Address: '48.29.4.201'
      }
    ]
  }
}

output nameServers array = zone.properties.nameServers
Similarly, creating a Private DNS Zone is just as easy. Just make sure to create the right virtual network links so you can actually use them from your VNets
resource privateDnsZone 'Microsoft.Network/privateDnsZones@2020-06-01' = {
  name: name
  location: 'global'
}

// Create a virtual network link to link the zone to a VNet
// You have to create a virtual network link for every VNet you want to enable the zone for
resource virtualNetworkLink 'Microsoft.Network/privateDnsZones/virtualNetworkLinks@2020-06-01' = {
  name: 'vnetlink-hub'
  parent: privateDnsZone
  location: 'global'
  properties: {
    registrationEnabled: true // Auto registration of VM's
    virtualNetwork: {
      id: virtualNetworkResourceId // The ID of the VNet you want to link to
    }
  }
}

resource record 'Microsoft.Network/privateDnsZones/A@2020-06-01' = {
  name: 'api' // Subdomain
  parent: privateDnsZone
  properties: {
    ttl: 3600
    aRecords: [
      {
        ipv4Address: '10.50.2.41'
      }
    ]
  }
}
You can use these basic examples to create your own smart and reusable modules. Something that’s very useful is to combine output variables together with these basic building blocks, for example to automatically create records for VM’s/Load Balancers/other resources you create in your infrastructure. This way, you can ensure that all resources are automatically added to the DNS Zone and that you don’t have to manually add records for every resource you create.
I’m personally a big fan of the Common Azure Resource Modules Library (CARML) library which has great easy to use templates available for many resources. They have great reusable modules available for creating Public DNS Zones + records in one module definition and especially using the Private DNS Zones module is a breeze for setting up everything plus all VNet integrations in a few lines of code. It’s worth checking out even if it’s just to gain inspiration for setting up your own easy-to-use templates.
Note: Many CARML modules are being migrated/upgraded to the Azure Verified Modules (AVM) project, which is a more complete approach to managing Azure resources using great Bicep and Terraform building blocks. You can find out more about the AVM project over here.
Wrapping up
So there you go! What I thought would be a quick and easy blogpost to write turned out into a pretty long read with lots of different aspects of DNS being covered. I hope you’ve learned something new about Azure DNS and how you can use it to manage your DNS records in Azure. I personally think it’s a great service that’s very easy to use and has a lot of powerful features that can help you manage your DNS records in a more efficient way.
Comment section
Got any questions or feedback? Leave a comment using GitHub issues!