
The Problem
If you’ve deployed a number of Azure Container Apps, you’ve likely run into this issue at some point. Your Bicep files are all set up cleanly, you managed to figure out how to pull images neatly from your container registry using managed identities, and now you’re running into the following: even though you changed nothing in the container app infrastructure, you notice that container apps are restarted/reprovisioned when you deploy your Bicep.
This is because of one well known oddity about deploying Azure Container Apps for the first time: a new container app always needs an image to run, even during your first deployment. This means you’ll find lots of resources on the internet about providing a “hello world” image during your first deployment, and later changing it to your actual application image. The restarting problem stems for this: because if you always need to provide an image during deployment, this means you’ll also need to provide an image tag. And what image tag is better suited than latest when writing your IaC?
In this case it doesn’t matter whether you’re deploying a single container app at a time, or whether you’ve got one global repository containing all ACA definitions that is rolled out in one big deployment. The issue lies in the fact that there are differences between your IaC and the actual instance running in Azure. In my experience, this is because your IaC contains different tag when compared to the running instance!
There’s multiple possible solutions to this problem, and I want to showcase two in this blogpost.
Base setup
I’ve prepared a small sample base setup: one container app environment with one container app. In a real-world scenario, there’s multiple ways to set this up: you could keep the creation of the environment in a central infrastructure repository and keep the container app code inside of the repo of the actual container you want to deploy. Or you could set up everything inside of one big repository, where you manage everything about your cloud environment from a single space.
Whatever you choose, you’re going to have to create a Container App Environment, and within that environment create a Container App at some point. This code snippet below shows a very basic setup of such an environment plus one app.
targetScope = 'resourceGroup'

param environmentName string
param appName string
param location string

resource containerAppEnvironment 'Microsoft.App/managedEnvironments@2023-05-01' = {
  name: environmentName
  location: location
  properties: {
    workloadProfiles: [
      {
        name: 'Consumption'
        workloadProfileType: 'Consumption'
      }
    ]
  }
}

resource containerApp 'Microsoft.App/containerApps@2023-05-01' = {
  name: appName
  location: location
  properties: {
    managedEnvironmentId: containerAppEnvironment.id
    configuration: {
      ingress: {
        targetPort: 80
        external: true
      }
    }
    template: {
      containers: [
        {
          image: 'mcr.microsoft.com/azuredocs/containerapps-helloworld:latest'
          name: 'simple-hello-world-container'
        }
      ]
    }
  }
}
As you can see in the highlighted line, this basic sample shows you need to specify a registry, image and image tag when you create a new Container App. Herein lies the root of all our problems, because if we want our infrastructure as code to be a ‘static’ reflection of our infrastructure, how do we account for the image tag being updated continuously by the application teams?
Solution 1: Checking pre-deployment using Azure CLI
One simple way to achieve this is to fetch information about the currently running revision, and pass that information to your deployment as parameters. For this, I’ve slightly changed the base setup shown earlier to accept a new tag parameter which can be passed when you create the deployment.
...
param tag string

resource containerApp 'Microsoft.App/containerApps@2023-05-01' = {
  ...
    template: {
      containers: [
        {
          image: 'mcr.microsoft.com/azuredocs/containerapps-helloworld:${tag}'
          name: 'simple-hello-world-container'
        }
      ]
    }
  }
}
The next step is to retrieve the current running revision of the Container App first, get information about the container and from there get the tag so it can be passed to the deployment. For this purpose, you can invoke the deployment using a small bash script like shown below (credits to the PlatformPlatform sample repository for having tons of great reference resources!), which you can easily embed into your CI/CD pipeline.
resourceGroupName=...
environmentName=...
appName=...
location=...

image=$(az containerapp revision list --name $appName --resource-group \
      $resourceGroupName --query "[0].properties.template.containers[0].image" --output tsv 2>/dev/null)
tag=${image##*:}

echo Found revision running with image $image and tag $tag

az deployment group create \
    --resource-group $resourceGroupName \
    --template-file withtagparameter.bicep \
    --parameters environmentName="$environmentName" appName="$appName" location="$location" tag="$tag"
Now, when you run your deployment you’ll notice it first checks for the running revision and passes the image tag to the deployment! For real production scenarios, you’ll of course want to make this a bit more resilient: for example, what if you have multiple revisions running with different tag versions? But with this script acting as a base that’s something you can easily iterate on.
Solution 2: Checking during deployment using Deployment Scripts
The previous example works fine, but there’s another way to do this without having to rely on scripting/logic outside of your infrastructure as code templates. I also pushed further to try out this solution because I’m personally working in an environment where all Container App infrastructure is deployed at the same time from one global infrastructure repository. This means I’d have to collect a lot of information on a lot of Container Apps at the same time before starting my deployment. The additional risk in a bigger-scale set-up is running into tag differences from when I started the infrastructure deployment compared to when the actual singular Container Apps are deployed, which might be ten to thirty minutes based on how many global infrastructure resources you’re deploying first, like Azure Firewall and SQL Server, which is enough time for an application team to release a new version of their Container App.
Deployment Scripts to the rescue
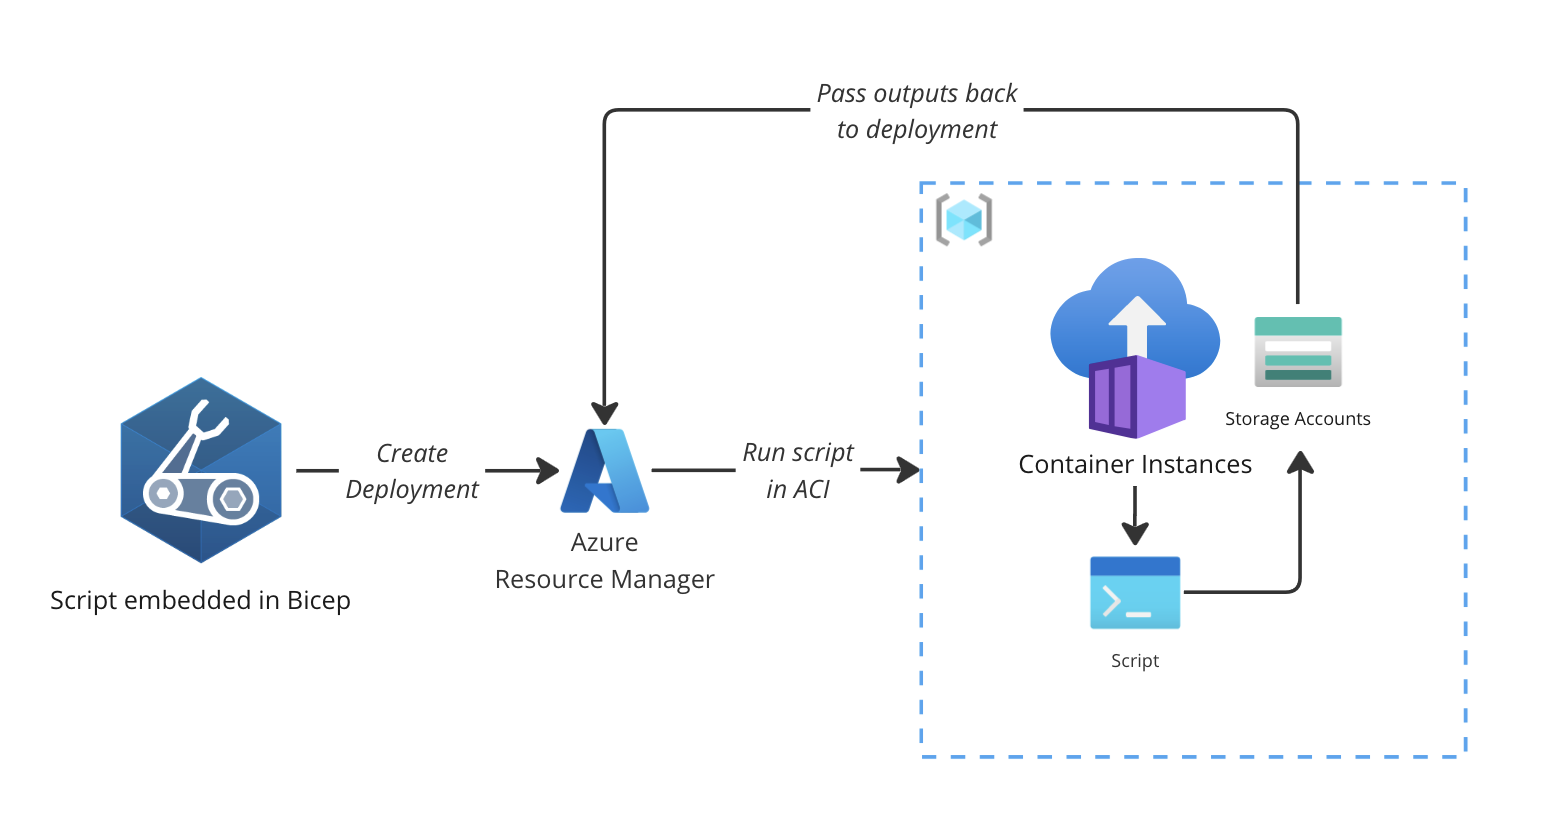
Which leads me to Azure Deployment Scripts: a way to run this same revision tag checking logic, but as close as possibile (in time and location) to your individual Container App deployment, even when orchestrating tens or hundreds of Container App deployments at the same time. Deployment scripts actually take your Azure Powershell or Azure CLI Bash script, package them in a lightweight container and run them in an Azure Container Instance which is stopped and deleted after the script executes. Outputs are written to a JSON file stored in a temporary storage account, from where they are passed back to the deployment to pass along to other parts of your deployment.
Preparing the stage
First of all, you’re going to create a User Assigned Identity, an identity that can get assigned roles at different scopes. Using this identity, you can set up a new deployment script that acts on behalf of the identity. This means that you will also need to assign the right role at the right scope for your identity. For this script, you’re going to need to give it a Reader role at the Subscription level.
Deploy this identity somewhere in advance and give it the correct role assignments at your desired scope. In my project, I’ve got one identity that has reader permissions on all subscriptions where it has to be able to check information on Container Apps, but you could also narrow this down to one per subscription, or even one per resource group where you’re deploying a Container App.
resource identity 'Microsoft.ManagedIdentity/userAssignedIdentities@2023-01-31' = {
  name: 'mi-aca-get-image-tag'
  location: location
}
It’s showtime!
Now that we’ve got our identity all set up, you can finally create your deployment script.
param currentTime string = utcNow()
resource deploymentScript 'Microsoft.Resources/deploymentScripts@2023-08-01' = {
  name: 'GetContainerAppImageTag-${appName}'
  location: location
  kind: 'AzurePowerShell'
  identity: {
    type: 'UserAssigned'
    userAssignedIdentities: {
      '${identity.id}': {}
    }
  }
  properties: {
    azPowerShellVersion: '9.7'
    environmentVariables: [
      {
        name: 'appName'
        value: appName
      }
      {
        name: 'resourceGroupName'
        value: resourceGroup().name
      }
    ]
    scriptContent: '''
      Write-Host "Installing Azure Container Apps Powershell module..."
      Install-Module -Name Az.App -Force

      Write-Host "Checking container app '$env:appName' in resource group '$env:resourceGroupName' for active revision..."
      try {
        $containerAppRevision = Get-AzContainerAppRevision -ResourceGroupName $env:resourceGroupName -ContainerAppName $env:appName
        $image = $containerAppRevision.TemplateContainer.Image
        $version = $image.Split(":")[-1]
        Write-Host "Found image: $image with tag: $version"
        $DeploymentScriptOutputs = @{}
        $DeploymentScriptOutputs['tag'] = $version
      } catch {
        Write-Host "Failed to get active revision. Error:"
        Write-Host $_
        Write-Host "No active revision found. Is this the first deployment? Using 'latest' as tag."
        $DeploymentScriptOutputs['tag'] = "latest"
      }
    '''
    cleanupPreference: 'Always'
    retentionInterval: 'PT1H'
    forceUpdateTag: currentTime
  }
}

output currentImageTag string = deploymentScript.properties.outputs.tag
There’s a lot to break down here. Let’s start with the basics: the kind of script you want to run and the identity you want to assign to the script execution.
resource deploymentScript 'Microsoft.Resources/deploymentScripts@2023-08-01' = {
  ...
  kind: 'AzurePowerShell' // Can be AzurePowershell or AzureCLI (which uses Bash)
  ...
  identity: {
    type: 'UserAssigned'
    userAssignedIdentities: {
      '${identity.id}': {} // Your newly created User Assigned Identity ID is passed here
    }
  }
}
Next, you can easily pass values along to the script using environment variables, which can be read in the script using $env:variableName. Good to note is that you can also pass script arguments, which work slightly differently from environment variables.
resource deploymentScript 'Microsoft.Resources/deploymentScripts@2023-08-01' = {
  ...
  properties: {
    ...
    environmentVariables: [
      {
        name: 'appName'
        value: appName
      }
      {
        name: 'resourceGroupName'
        value: resourceGroup().name
      }
    ]
  }
}
Now, just a little bit more until we can finally execute our script. The following set of parameters will help you decide what the behavior of the deployment script will be in case of failure or success.
resource deploymentScript 'Microsoft.Resources/deploymentScripts@2023-08-01' = {
  ...
  properties: {
    ...
    azPowerShellVersion: '9.7' // The version of Azure Powershell you want to use
    cleanupPreference: 'Always' // Always clean up, or keep it alive after running?
    retentionInterval: 'PT1H' // Keep it around for an hour after it finishes
    forceUpdateTag: currentTime // Ensures script will run every time, even if a previous instance still exists
  }
}
Finally, the script itself is using Azure Powershell to do the same thing as the Bash script shown in Solution #1. After installing the Az.App module, you can use Get-AzContainerAppRevision to get information about the currently running Container App revision. If you’ve assigned the right role to the User Assigned Identity, it should be able to retrieve this information from your subscription.
Write-Host "Installing Azure Container Apps Powershell module..."
Install-Module -Name Az.App -Force

Write-Host "Checking container app '$env:appName' in resource group '$env:resourceGroupName' for active revision..."
try {
  $containerAppRevision = Get-AzContainerAppRevision -ResourceGroupName $env:resourceGroupName -ContainerAppName $env:appName
  $image = $containerAppRevision.TemplateContainer.Image
  $version = $image.Split(":")[-1]
  Write-Host "Found image: $image with tag: $version"
  $DeploymentScriptOutputs = @{}
  $DeploymentScriptOutputs['tag'] = $version
} catch {
  Write-Host "Failed to get active revision. Error:"
  Write-Host $_
  Write-Host "No active revision found. Is this the first deployment? Using 'latest' as tag."
  $DeploymentScriptOutputs['tag'] = "latest"
}
Tip: Do you have one User Assigned Identity reading Container Apps in multiple subscriptions? You might have to explicitly call
Set-AzContext -SubscriptionId <subscriptionId>at the start of the Powershell script. You can pass the subscription ID in as an environment parameter to make this dynamic as well.
Finally, you can pass outputs from the deployment script using the $DeploymentScriptsOutput dictionary, which you can use in your Container App deployment using the deploymentScript output property.
resource containerApp 'Microsoft.App/containerApps@2023-05-01' = {
  ...
  properties: {
    ...
    template: {
      containers: [
        {
          image: 'mcr.microsoft.com/azuredocs/containerapps-helloworld:${deploymentScript.properties.outputs.tag}'
          name: 'simple-hello-world-container'
        }
      ]
    }
  }
}
Now that everything is set up and connected, let’s try it out!
Running it
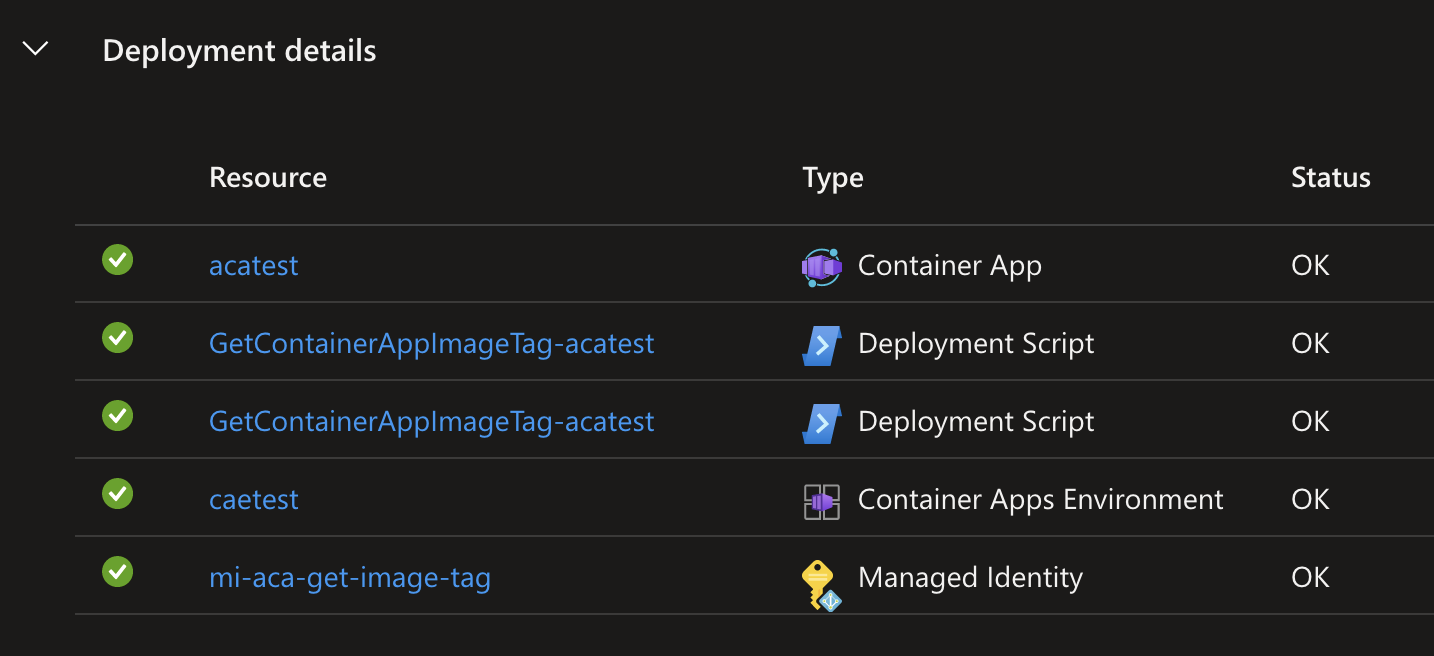
Now, when running the deployment, you’ll see the deployment script resource being created and executed.
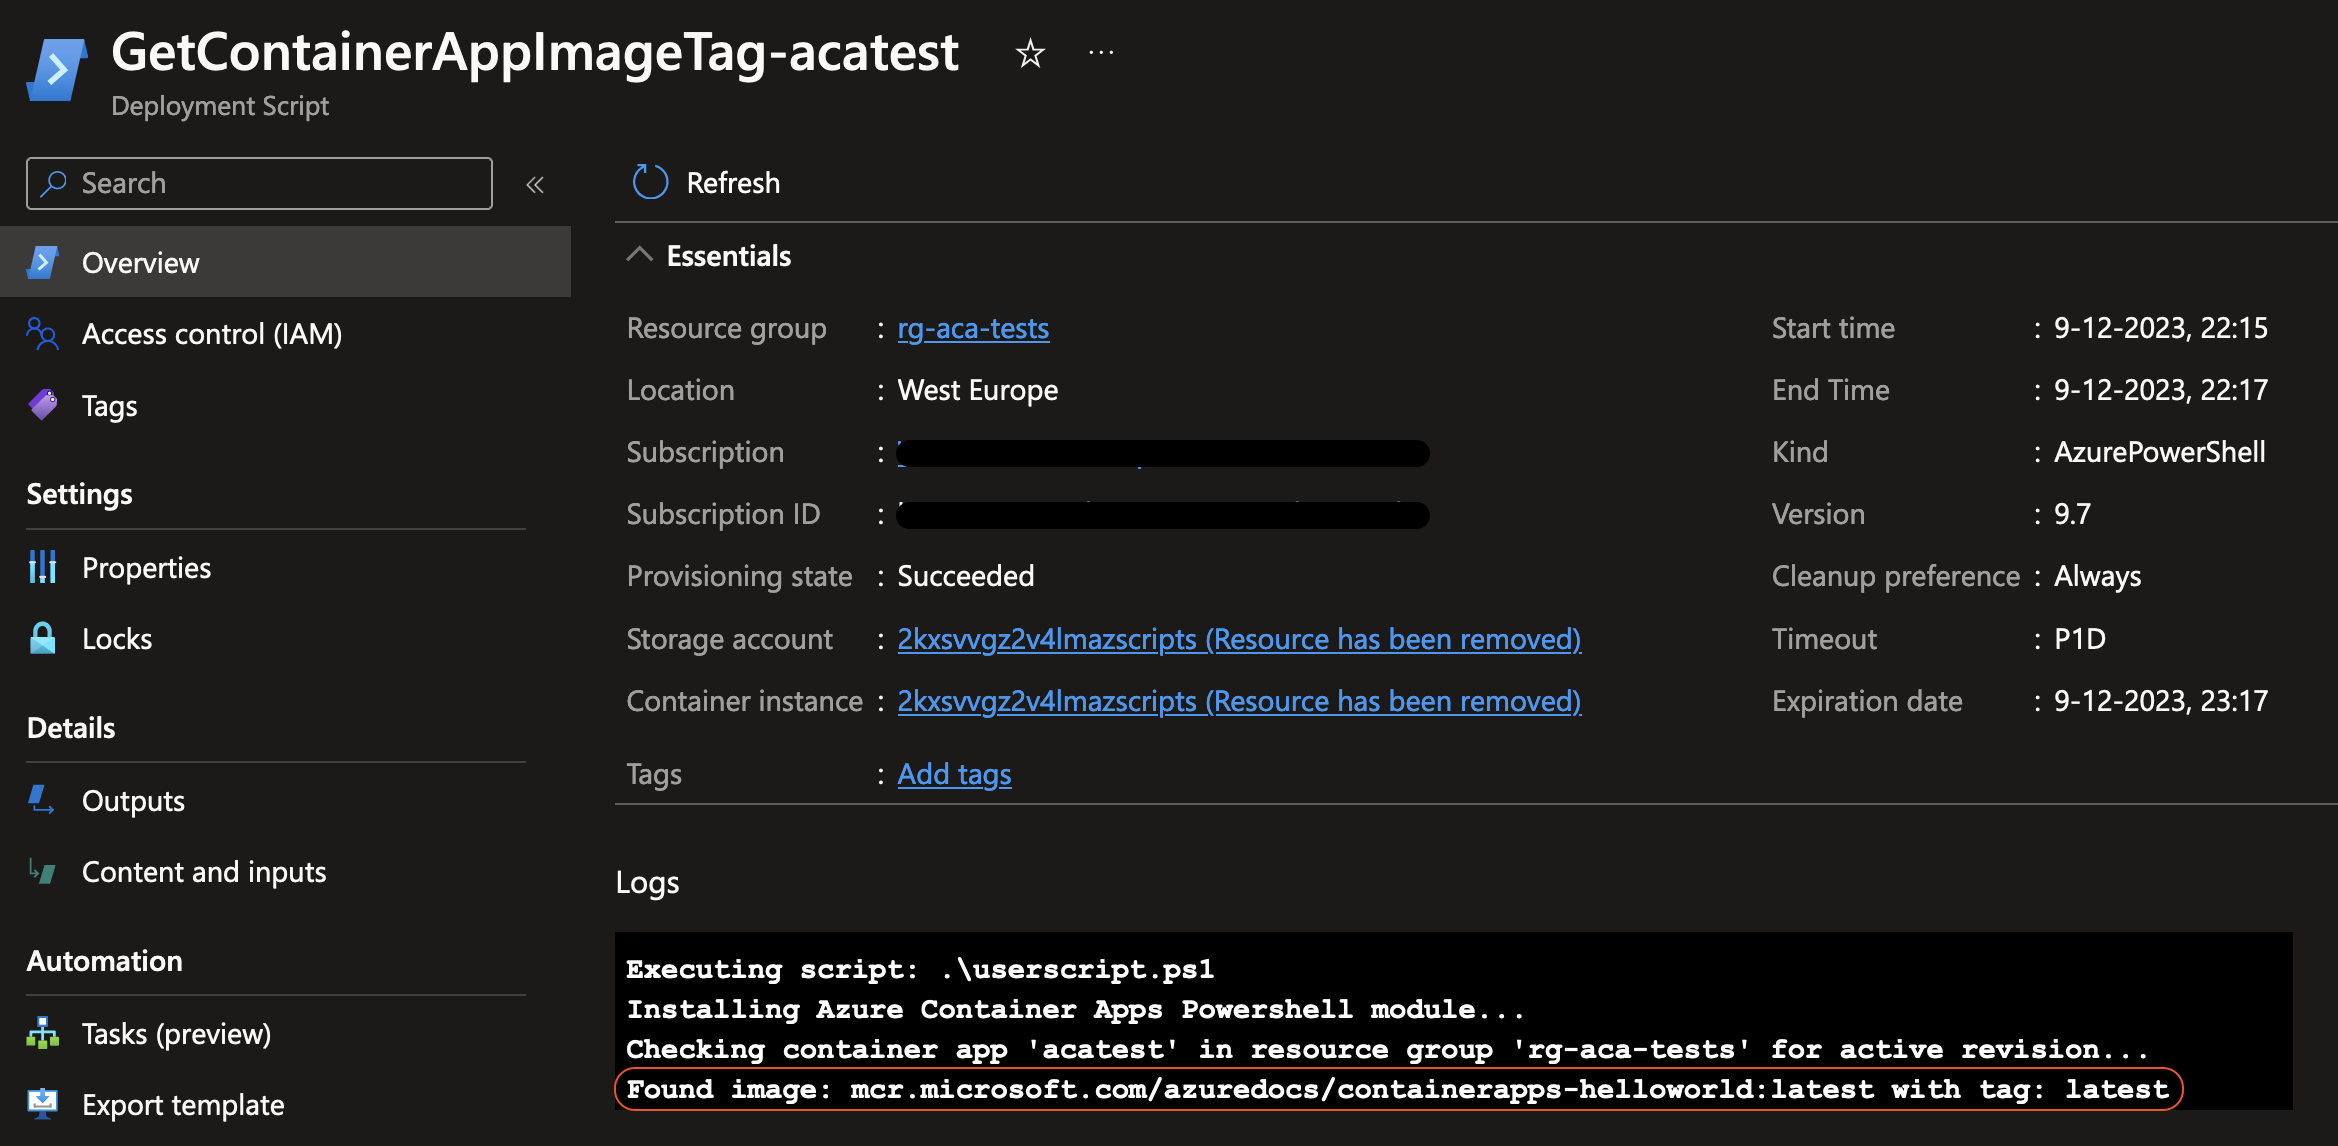
And when clicking on the deployment script, you can see it succesfully managed to retrieve information about the running Container App Revision!
Wrapping up
I hope you found something useful in these examples! Even if you’re not running into this exact problem, I hope this shows you the power of deployment scripts. Keep an eye on my socials/blog, because I’ll be posting more content soon!
Want to see both complete solutions? Check out my Azure Container App samples repository on GitHub!
Comment section
Got any questions or feedback? Leave a comment using GitHub issues!